Hello everybody, it is Brad, welcome to our recipe site. Today, I will show you a way to make a distinctive dish, authentic peperoncino with anchovies. One of my favorites. For mine, I will make it a bit unique. This is gonna smell and look delicious.
Authentic Peperoncino with Anchovies is one of the most popular of recent trending foods in the world. It is enjoyed by millions daily. It is simple, it’s quick, it tastes delicious. They’re fine and they look wonderful. Authentic Peperoncino with Anchovies is something that I’ve loved my entire life.
This is an Italian classic dish. It contains garlic, olive oil, chili flakes and anchovies. But it can definitely be cooked using. Hello mga ka monkey Ayus ba tayo dyn?
To get started with this recipe, we have to prepare a few ingredients. You can have authentic peperoncino with anchovies using 9 ingredients and 28 steps. Here is how you cook that.
The ingredients needed to make Authentic Peperoncino with Anchovies:
- Take 100 grams Pasta (I recommend pasta about 1.4-1.6 mm thick)
- Take 45 ml A. Extra virgin olive oil
- Prepare 2 clove A. Minced garlic
- Get 1 Red chili peppers (sliced into rounds)
- Make ready 1 Minced anchovy filet
- Take 1 tsp B. Cake flour
- Prepare 50 ml B. Water
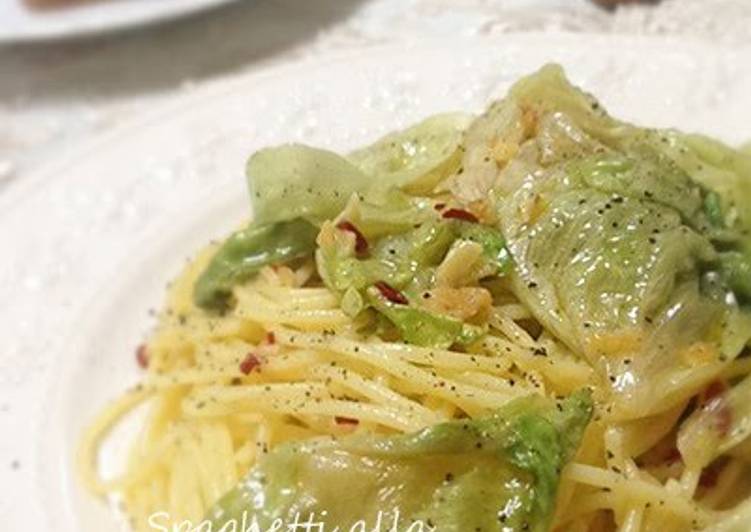
- Get 1 Extra ingredients of your choice that aren't salty, like the lettuce in the top photo
- Prepare 1 Black pepper
Like most peppers, the fruit is green or yellowish-green when young, and ripens to a red color. Svernare peperoncini: tutorial su come far sopravvivere le piante di peperoncino in inverno. I consigli da seguire per svernare le piante in casa. Chi non ha esperienza nella coltivazione del peperoncino spesso pone la domanda "ma è vero che i peperoncini vivono soltanto un anno?".
Steps to make Authentic Peperoncino with Anchovies:
- Heat 3 liters of water in a large pot. When it is nearly boiling, add 2 tablespoons salt.
- The amount of salt added in Step 1 determines the taste of this dish, so measure it carefully. *When the water comes to a boil, lower the heat and keep it on low.
- Combine the B ingredients. *Mix the flour in well, until there are no more lumps.
- Put the A ingredients in a cold frying pan and cook over low heat The oil will become infused with the fragrance of the garlic.
- Add the red chili peppers to the Step 4 mixture when it starts to sizzle and the garlic is fragrant, but before the garlic starts to turn brown.
- Start to boil the pasta at the same time, over low heat. Cook it al dente, or 30 seconds to 1 minute less than the cooking time on the package.
- When the garlic in Step 5 starts to brown, add the anchovies. Cook for another 2-3 minutes, then turn off the heat.
- Pour the flour dissolved in water from Step 3 into the pan in Step 7. Cook over medium heat, lifting up the pan and giving it a shake every 15 seconds.
- Important point: When the liquid in the pan in Step 8 starts to thicken and emulsifies, immediately turn off the heat.
- Emulsification is very important for oil based pasta. The water used for boiling pasta at home, where you are only cooking a small amount, is different from that of restaurants.
- Adding cake flour makes it easier to emulsify. This little trick is important to make it taste like pasta served at a restaurant.
- I usually use water from boiling the pasta to dissolve the flour, but this time I used ordinary water, taking into account the saltiness of the anchovies.
- When the pasta is cooked, raise the heat under the frying pan in Step 11 and add the drained, cooked pasta. *I added lettuce this time.
- Stir up the pasta so that it's coated with the oil. *See Step 18 for instructions about the lettuce.
- Transfer to a serving plate, sprinkle with black pepper, and it's done. I don't think you'll need to adjust the seasoning.
- I like to drizzle on a bit of anchovy oilat the end. - - https://cookpad.com/us/recipes/172248-all-purpose-anchovy-oil
- This is a very simple pasta dish seasoned with only the salt from boiling the pasta, anchovies, garlic and chili peppers, which is why it's so delicious. Try it for a quick dinner!
- Lettuce peperoncino: Put as much lettuce as you like in the strainer you'll use to drain the pasta.
- Drain the cooked pasta over the lettuce in the strainer and follow the steps from 13 onward.
- You can also dip the lettuce in the water for boiling the pasta in Step 6. Do it for a short time, so it stays crisp.
- Mushroom peperoncino: Mushrooms cook quickly, so add them right after Step 7, and sprinkle with salt and pepper.
- Cook the mushrooms for 2-3 minutes, then proceed to emulsification Steps 8 and 9.
- Combine with the cooked, drained pasta as in Steps 13 and 14.
- Add in the extra ingredients of your choice in Steps 5-7, taking into account the cooking time of the ingredients.
- Use a separate frying pan for other ingredients that take longer to cook, or absorb a lot of oil, like eggplant. Cook them with garlic oil.
- You can also use garlic oil for Steps 4 and 5, or use.
- For a basic peperoncino, check out. Each recipe has its merits.
- "Cilantro peperoncino"is inspired by Southeast Asian cuisine. If you like cilantro, you'll love this.
I consigli da seguire per svernare le piante in casa. Chi non ha esperienza nella coltivazione del peperoncino spesso pone la domanda "ma è vero che i peperoncini vivono soltanto un anno?". Guide sulla coltivazione del peperoncino piccante: scelta della varietà più piccanti, proprietà ed utilizzi della capsaicina comprese le ricette hot. Peperoncino is a unique product of the Calabria region. Peperoncini can be eaten whole, fried until crisp, crushed, powdered or made into a paste with olive oil.
So that’s going to wrap this up for this special food authentic peperoncino with anchovies recipe. Thank you very much for your time. I am confident you will make this at home. There is gonna be more interesting food in home recipes coming up. Remember to bookmark this page in your browser, and share it to your loved ones, colleague and friends. Thanks again for reading. Go on get cooking!